Tuesday, December 29, 2009

How To Make a Grow Bed (PART 6 - Auto-Siphon)

This, to me, was the most amazing part of aquaponics. The fact that this siphon works with nothing more than natural physics was what attracted me to use it in my system. Nothing can be better than using the forces that naturally exist in our environment in order to make something work. It takes a little adjusting to make it work properly, but once you find the perfect adjustment, if you then secure it in position, it will run forever. Of coarse there are a few circumstances that can deteriorate its performance and maybe stop it altogether, such as large algae build-up or freezing temperatures. Nonetheless, it is an effective way to make the system function, and without it, aquaponics might not be as attractive.


Setting Up Your Auto-Siphon (Step 4 added Dec 31 for continuous flow drains)


Make sure your bulkheads are complete and leak-free before moving on to this instruction.

Materials Needed:
You shouldn't need any more materials if you have set up your drains according to the last instructions. But in case you just skipped that and set up your own bulkhead you will need the following:

For 3/4" bulkheads:
~4' to 5'  of hose/tubing that will fit into your bulkhead(5/8" ID Braided Tubing will fit perfectly into a 1/2" PVC adapter or fitting)
3/4" to 1/2" PVC slip adapter/bushing
~2' of 3/4" PVC pipe
4' - 3" or 4" perforated drain pipe


NOTE - if your bulkhead is other than 3/4" or you are using different size tubing, then you will have to figure out the correct sizes you will need. If using a 1/2" bulkhead you will use everything listed except the 3/4" to 1/2" adapter.

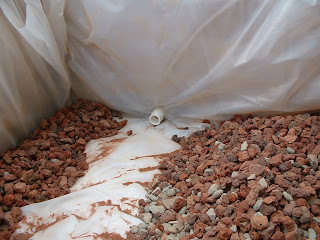
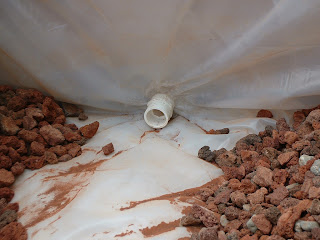
At this point you should have something like this on the inside of your grow bed...


STEP 1

Take your 3/4" PVC pipe and drill holes in it. Lots of them! When finished, connect it to your bulkhead on the inside of the grow bed. Do not glue it on. You might need to take this off and clean it later on down the road. Then take your drain pipe and slide it over the pvc pipe. This will prevent your drain from getting clogged while allowing a free flow of water to the drain. A 4' length will fit from side to side inside your bed.


STEP 2

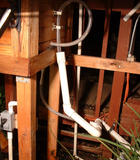
Connect the tubing to your bulkhead by inserting the adapter into the bulkhead and then the tubing to the inside of the adapter. Do not glue anything at this point. You can glue this together once you have the auto-siphon working. But for now you should leave it unglued. Loop your tubing up and around, ending into your drain pipe(return line to the pond). If you haven't setup your piping yet, now would be a good time.


The above image shows a functioning auto-siphon going into a return line.
The second pipe with tubing is coming from another grow bed.
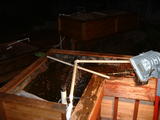
Both of the grow beds were custom made to attach to my preexisting deck.

STEP 3
Turn on your water inlet to your grow bed. If you haven't set that up then just use a hose. Open the flow 100%. Once the water gets close to the top of the tubing turn your water source way down, making the flow about where you are going to want it once the system is running. Watch the water slowly start to trickle down the tubing into the drain. This is where the adjusting comes into play. If the trickle of water remains for more than about two or three minutes, then your flow is too low. Turn it up a bit. If your siphon kicks in, but the water level in your grow bed is still increasing or remains the same, then your flow is too high. Turn the flow down until you can see the water level lowering. You might have to play with this a bit to get the flow adjusted correctly. Once you have it where you want it let it run for a couple of hours and keep an eye on it. If you are using a hose. Turn it off and get to work on your piping.

If you are not implementing a continuous flow to the auto-siphon then you are ready to add your media and finalize the grow bed(next instructions) and you can skip step 4.

STEP 4 (Only for setting up a constant flow drain to your auto-siphon)

The setup for this is almost exactly the same as for the auto-siphon, except that it is in a verticle position instead of horizontal. Plus the output is not in a loop and can be PVC pipe instead of tubing or hose. You will also need to add a ball valve to control the output. It is not necessary, but will aid in stopping the drain if you need to. It also can be advantageous for adjusting flow rate through the drain. So I recommend adding it, even if you don't see the need for it at the moment.


The idea behind adding a constant flow(CF) drain to the auto-siphon is to allow a continuous, filtered water supply to your pond. This is great for waterfalls, but is important for good aeration.

How it works:
The important thing here is to allow slightly more water to enter the grow bed than is flowing out through the CF drain. By doing this the water will still fill the grow bed and let the auto-siphon work its magic for a "Flood and Drain" system. Basically you will be getting the benefits of both types of systems in one.

Here are some photos from when I setup my CF drain:


Once you get the drain setup properly, you will need to adjust the flow coming into the grow bed and possibly the output. This took me a couple of days to get the flow exactly right. The biggest propblem I had was the flow rate out of the drain depended on the amount of water in the grow bed. When it is full, the flow rate is at its highest. Once the water level starts getting close to the bottom, the flow rate slows down. When adjusting the water input if you allow too much flow, the auto-siphon, when finishing it's cycle, will trickle water instead of stopping. This "trickling" effect when added to the flow rate leaving the CF drain can equal the amount of water coming in, therefor never filling the bed back up. If you don't allow enough water through the input you may get a water level that remains constant or the auto-siphon might trickle water at the beginning of its cycle and never kick in. This "tricking" effect will will cause the water level to remain at a constant height. This would drown your plants root system. Now take that into consideration and add in the adjustment problems of just an auto-siphon and you can see why it took me a couple of days to get it right. Below is a chart to help you adjust the flow rates for the auto-siphon with a CF drain.

CURRENTLY CREATING A NEW CHART FOR BETTER ACCURACY

Monday, December 28, 2009

Sorry for the delay...

If you are wondering where the final couple of "How To Make A Grow Bed" instructions are, I am sorry for the delay. It's Xmas time and I took a little break. But I will be back at it tonight. Expect a steady stream of posts throughout the month of January.

Friday, December 11, 2009

How To Make a Grow Bed (PART 5 - Liner and Drains)

Putting in a liner is a pretty simple process. I will discuss how to install the two types I used for my project, EPDM rubber, and 4mil construction plastic.The first step will be for the sizing and layout for the liner, and applies to all types of flexible liners. The second step will discuss the drain bulkheads, which will be different for each liner. The last step will be for securing the liner and will apply to all flexible liners. All of these steps will have their own materials list.

STEP 1 - ADDING THE LINER

Make sure you have drilled your holes for the drains and you have prepared the bed before going forward.


Materials Needed:
12' x 8' EPDM rubber liner -or- 25' x 10' roll 4mil or greater construction plastic
12' x 8' Underlayment(carpet, construction plastic, foam padding, etc...)
10 - Tack nails or wood screws
Some grow bed media that you will be using to eventually fill the grow beds with(I used a mix of 3/4" lava and river rock. Or I just use lava since it is very light weight).


Cut your underlayment to size and lay it on top of the grow bed. If your underlayment is more than one piece, place it where it needs to be and overlap adjoining pieces then tape them together with duct tape.

Cut your liner to size. For construction plastic you will double it up by unrolling the entire roll and then fold it in half. This will give you a double layer. Once your liner is ready, place it on top of the underlayment. Now push them down on all four corners, making sure you have an equal amount of liner on all opposite sides. Once you feel everything is lined up, take a straight edge and shove the liner completely into the corner adges along the bottom. Don't leave any space between the bed and the liner. It is important to not have any gaps. Add some grow bed media to keep the liner held down. Now tack or screw down the very top of the liner in several places to temporarily secure it.


STEP 2 - DRAIN BULKHEADS

Materials Needed
For Plastic Liners


For EPDM Liners


All the bulkheads(auto-siphon, overflow, and continuous flow) will use the exact same materials. Not shown in the images above, you also need a 3/4" to 1/2" adapter bushing for the plastic liner that will connect the braided hose to the bulkhead(not needed for EPDM). You will also need PVC glue and silicone(use 100% silicone). 


STEP 2A

Here is the connection order for the plastic liner bulkhead. For EPDM liners, just substitute the adapters with the water-tight adapter(shown in the second image below).


Drill holes in the 3/4" pvc pipe and the 3" drain pipe


STEP 2B

Closeups of the 3 items needed for a single plastic liner bulkhead:


For plastic liners, using PVC glue, connect the bushing into the slip side of the adapter with the female threads.


STEP 2C

Plastic Liner:
Locate the center of the drain hole that you will start with. Cut a very small hole in the liner directly in the center of the drilled drain hole.


EPDM Liner:
Locate the center of the drain hole that you will start with. Cut a hole in the liner directly lined with the center of the drilled drain hole. The hole should be circular(as much as possible) and about 3/4" in diameter, which is slightly smaller than the male thread of the water-tight adapter.


STEP 2D

With the adapter containing the bushing in it on the outside of the liner(going into the drilled hole), position the small liner hole in the center of the adapters and press them together. Give a slight twist while pushing together to secure the adapters together. DO NOT TIGHTEN, you can tear the liner if you tighten them without silicone as a lubricant. The adapters should barely be connected. In the photo below I used a scrap piece of plastic to give you an idea what to do.


STEP 2E

 Liberally add silicone to each side of the liner where the adapters will be screwing together. Push the silicone deep into the joints.


STEP 2F


Fully tighten the adapters. They should be very easy to turn with the silicone acting as a lubricant. Make sure they are completely connected with the washer pressing tightly against the liner, but do not over-tighten.


STEP 2G
Place the bulkhead into the drilled hole. Take a brick or something heavy and push it against the face of the bulkhead to keep it in place and straight. The second image shows the brick against a bulkhead for an EPDM liner. Notice how it keeps the bulkhead perfectly straight and pressed against the grow bed wall.


Let dry 24 hours minimum.

STEP 2H
Clear the plastic liner from inside the bulkhead. Be very careful, do not pull it, try to cut it out with scissors or a knife. This doesn't apply to the EPDM liner bulkhead, it should be free and clear, but remove any silicone that might be inside the adapter. Once completely cleared, add the tubing and the drilled PVC to the bulkhead. Do not glue anything together.


If your pipe is in place, take the tubing and secure it in a loop into the pipe. The piping and auto-siphon are discussed in other instructions. But from the photo's below, you can get the idea.


STEP 3

Materials Needed:
3 - 2" x 4" x 8' studs
14 - 2 1/2" Wood Screws
1 - 2" x 4" x 8' stud (optional)

Cut one of the 2x4's to get two lengths of about 40". Trim the other 2x4's to about 90". Secure the top of the liner by pressing the 2x4's against the liner and pressing it against the wall of the grow bed. Do this as far up the wall as possible. Screw them tight. Optionally you can add cross boards for added strength to the grow beds as in the following photos. You will have to notch the liner supports in order for you to fit them in. This is a lot of extra work and can be a hassle for the inexperienced carpenter.


To test for leaks you can plug the drains with PVC pipe and a PVC cap(DO NOT GLUE THIS ON) then fill partially the bed with water. Let stand overnight. A word of caution here, try not to get water in between the liner and the bed. It will drip and look as though it is leaking. This little bit of water can take days(yes days) to drain and stop dripping. I have been fooled into thinking I had a leak more than once from this.

If, and only if, your drain is fully assembled(for the auto-siphon, which is the next instructional), you can go ahead and add all of your grow bed media at anytime.

Now we are getting close to the real fun. :)

Flood & Drain

There are two systems I will describe, "Normal" flood and drain operation and a "Continuous Flow + Flood and Drain" system. What is meant by "F&D"(Flood and Drain) is that your grow bed will fill to a level that you decide, drain itself, and repeat continuously. This is in contrast to a "Continuous Flow" operation, where the water level remains constant. The advantage of F&D is that the plant roots are supplied with oxygen when the water is low and then supplied with nutrients when it is up. With a continuous flow operation the roots have problems either getting oxygen or getting to the nutrients. F&D is the preferred method for almost all aquaponic systems. But, as I will show you, you can combine the two for better filtering with a large pond.

CONTINUOUS FLOW + FLOOD AND DRAIN


The continuous flow can be integrated with F&D by adding a drain hole that allows water to freely drain, but at a rate that is lower than the input. This allows the grow bed to slowly fill. The auto-siphon will kick in once the desired water level is achieved. Once the water level gets low enough, the auto-siphon will stop and the bed will fill up again. The advantage here is that the water will never stop flowing to your pond. This is great for water features such as a waterfall and for giving your pond a strong current for better aeration. I initially designed this to keep a constant supply of filtered water to my waterfall, but water flow it created was a great side benefit. I highly recommend this method regardless of you having a waterfall or not. But if you want simplicity, go with normal F&D. Getting the flow correct won't be as tricky.


The normal flood and drain will not supply water to the pond on a continuous basis. While the bed is filling and before the auto-siphon kicks in, there is no water flowing to the pond. This might not be a problem if you do not have a water feature and/or more than one grow bed. While this may be OK for a smaller system, I still recommend the "Continuous Flow + F&D" simply for the aeration that the water flow will help provide.

DRAIN AND OVERFLOW HOLES

When you drill your holes for the drains you will be using a 1 3/8" drill bit for EPDM liners and 1 1/4" bit for construction plastic. For continuous flow you will want a three hole setup. For normal operation you will drill two holes, one for the drain(auto-siphon) and one for overflow.

Type of Liner
Drill Bit Size
EPDM
1 3/8”
Plastic
1 1/4”


Type of Drain
Number of Holes
Normal F&D
2
CF F&D
3

The location of your holes is up to you. They should be wherever it is convenient and close to your return pipe. The auto-siphon hole will be at the very bottom of a side wall. The overflow hole is near the top, below the edge of your liner. The continuous flow hole will go on the bottom of the grow bed, up through the plywood.

Example of hole locations:


IMPORTANT NOTE - Make sure you drill the holes before you put the liner in.

Saturday, December 5, 2009

Before You Line Your Grow Bed

I wont go into much detail on installing the liner. Basically all you do is cut it to size and lay it in the bed on top of some type of liner protection(underlayment). It is very easy.

What the upcoming instructional will focus on is leak prevention and also how to make water tight bulkheads. Here I will go into what you can use as a liner and provide some instructions on how to prepare your grow bed for the liner. But the main thing to keep in mind here is "You do not want to fix any leaks after the grow bed is filled with rock". Trust me, do everything you can to prevent them ahead of time.

So let's talk about what you can use as a liner. The best thing is EPDM rubber that you should use for your pond. Order a little extra when purchasing your pond liner. There is nothing better and it will last a lifetime if you maintain it properly. Unfortunately, it is a lot more expensive than other things you can use. I ordered extra with my pond, but still did not have enough for all of my grow beds. So I went as cheap as I could for two of the beds. Eventually I will replace it with EPDM, but for now the budget would not allow it.

So what to use? Basically anything that would line a pool, will line a grow bed. Of coarse, concrete isn't really an option, but you could use it. But for practical purposes you need something light and flexible for a, much smaller than a swimming pool, grow bed. Like I said, I did what my budget allowed, I went cheap. 4mil construction plastic is very cheap, so cheap you can double it up to provide more protection. It costs around $20 US dollars for a roll that will easily be large enough for a single grow bed. The draw back to this is, that it will probably need to be replaced in a couple of years. Which really isn't a problem since by that time I will need to clean the bed out anyway. So I can just replace it at that time, hopefully with EPDM. There are some precautions to take when using it however. Never leave it exposed to sunlight. It deteriorates rapidly when exposed to sun. 3 weeks and it's done, crumbling to a fine plastic powder. Do not scrape or drag it over ANYTHING. It cuts fairly easy, and you can't always see the cut. Tears look like wrinkles and can be overlooked if you are not careful. Use heavy underlayment, including roofing patch to seal the bottom of the bed.

UNDERLAYMENT

For EPDM, you can use anything. Old carpet, towels, rags, etc... For construction plastic(CP), you should use something that is one piece such as carpet or another layer of plastic(which is what I used on one of them). A single piece will not have seams and spots that can wrinkle the plastic(not as many anyway), which is a potential area for a pinch tear.


Here you see the underlayment I used for one of the grow beds.
I used the foam underlayment from the old pool.


GROW BED LINER PREPARATION

Vacuum out everything that is loose inside the bed. Make sure to remove or cover any sharp edges, ties and brackets. Cover all corners with padding. Tar, foam padding, and silicon work great for both applications.


For better leak protection I sealed the bottom of the grow bed with roofing repair patch(black tar like stuff) spread over the bottom half of the beds. Then I placed the underlayment on top of that. Keep in mind where you want your drain and overflow bulkheads to leave the tar off of that area until you have drilled the holes for them. The good thing about tar(roofing repair) is that it will seal the bottom to help stop leaks and protect the wood underneath from rot. I used it on two of the beds, the same two that I used the construction plastic for the liner. You can also use it to cover the brackets and straps to protect the liner from coming in contact with them.


Here you can see a strip of wood I used to keep the 2x4's together tightly, covered in roofing repair.
You can also see two of the three layers of 4mil CP.
I used two layers for the liner and a third as underlayment.
The top layer got tucked under and out of sight, but it is there.