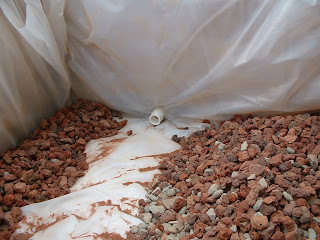
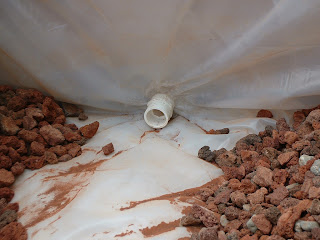
STEP 1 - ADDING THE LINER
Make sure you have drilled your holes for the drains and you have prepared the bed before going forward.
Materials Needed:
12' x 8' EPDM rubber liner -or- 25' x 10' roll 4mil or greater construction plastic
12' x 8' Underlayment(carpet, construction plastic, foam padding, etc...)
10 - Tack nails or wood screws
Some grow bed media that you will be using to eventually fill the grow beds with(I used a mix of 3/4" lava and river rock. Or I just use lava since it is very light weight).
Cut your underlayment to size and lay it on top of the grow bed. If your underlayment is more than one piece, place it where it needs to be and overlap adjoining pieces then tape them together with duct tape.
Cut your liner to size. For construction plastic you will double it up by unrolling the entire roll and then fold it in half. This will give you a double layer. Once your liner is ready, place it on top of the underlayment. Now push them down on all four corners, making sure you have an equal amount of liner on all opposite sides. Once you feel everything is lined up, take a straight edge and shove the liner completely into the corner adges along the bottom. Don't leave any space between the bed and the liner. It is important to not have any gaps. Add some grow bed media to keep the liner held down. Now tack or screw down the very top of the liner in several places to temporarily secure it.
STEP 2 - DRAIN BULKHEADS
Materials Needed
For Plastic Liners
For EPDM Liners
All the bulkheads(auto-siphon, overflow, and continuous flow) will use the exact same materials. Not shown in the images above, you also need a 3/4" to 1/2" adapter bushing for the plastic liner that will connect the braided hose to the bulkhead(not needed for EPDM). You will also need PVC glue and silicone(use 100% silicone).
STEP 2A
Here is the connection order for the plastic liner bulkhead. For EPDM liners, just substitute the adapters with the water-tight adapter(shown in the second image below).
Drill holes in the 3/4" pvc pipe and the 3" drain pipe
STEP 2B
Closeups of the 3 items needed for a single plastic liner bulkhead:
For plastic liners, using PVC glue, connect the bushing into the slip side of the adapter with the female threads.
STEP 2C
Plastic Liner:
Locate the center of the drain hole that you will start with. Cut a very small hole in the liner directly in the center of the drilled drain hole.
EPDM Liner:
Locate the center of the drain hole that you will start with. Cut a hole in the liner directly lined with the center of the drilled drain hole. The hole should be circular(as much as possible) and about 3/4" in diameter, which is slightly smaller than the male thread of the water-tight adapter.
STEP 2D
With the adapter containing the bushing in it on the outside of the liner(going into the drilled hole), position the small liner hole in the center of the adapters and press them together. Give a slight twist while pushing together to secure the adapters together. DO NOT TIGHTEN, you can tear the liner if you tighten them without silicone as a lubricant. The adapters should barely be connected. In the photo below I used a scrap piece of plastic to give you an idea what to do.
STEP 2E
Liberally add silicone to each side of the liner where the adapters will be screwing together. Push the silicone deep into the joints.
STEP 2F
Fully tighten the adapters. They should be very easy to turn with the silicone acting as a lubricant. Make sure they are completely connected with the washer pressing tightly against the liner, but do not over-tighten.
STEP 2G
Place the bulkhead into the drilled hole. Take a brick or something heavy and push it against the face of the bulkhead to keep it in place and straight. The second image shows the brick against a bulkhead for an EPDM liner. Notice how it keeps the bulkhead perfectly straight and pressed against the grow bed wall.
Let dry 24 hours minimum.
STEP 2H
Clear the plastic liner from inside the bulkhead. Be very careful, do not pull it, try to cut it out with scissors or a knife. This doesn't apply to the EPDM liner bulkhead, it should be free and clear, but remove any silicone that might be inside the adapter. Once completely cleared, add the tubing and the drilled PVC to the bulkhead. Do not glue anything together.
If your pipe is in place, take the tubing and secure it in a loop into the pipe. The piping and auto-siphon are discussed in other instructions. But from the photo's below, you can get the idea.
STEP 3
Materials Needed:
3 - 2" x 4" x 8' studs
14 - 2 1/2" Wood Screws
1 - 2" x 4" x 8' stud (optional)
Cut one of the 2x4's to get two lengths of about 40". Trim the other 2x4's to about 90". Secure the top of the liner by pressing the 2x4's against the liner and pressing it against the wall of the grow bed. Do this as far up the wall as possible. Screw them tight. Optionally you can add cross boards for added strength to the grow beds as in the following photos. You will have to notch the liner supports in order for you to fit them in. This is a lot of extra work and can be a hassle for the inexperienced carpenter.
To test for leaks you can plug the drains with PVC pipe and a PVC cap(DO NOT GLUE THIS ON) then fill partially the bed with water. Let stand overnight. A word of caution here, try not to get water in between the liner and the bed. It will drip and look as though it is leaking. This little bit of water can take days(yes days) to drain and stop dripping. I have been fooled into thinking I had a leak more than once from this.
If, and only if, your drain is fully assembled(for the auto-siphon, which is the next instructional), you can go ahead and add all of your grow bed media at anytime.
Now we are getting close to the real fun. :)


this is a great blog, for a while that i follow your posts. thank you for sharing with us your professional gardening knowledge. i am using your tips.
ReplyDeleteLiners are accessible in business sector yet in the event that you got some information about most grounded pond liner than Pond Liner by Pondpro2000 is the most grounded one. It opposes warmth, temperature and cut.
ReplyDelete