Showing posts with label Construction. Show all posts

Monday, March 29, 2010

Reuse

Wikipedia has an article on reuse. It gives a pretty good definition:
Reuse is to use an item more than once. This includes conventional reuse where the item is used again for the same function, and new-life reuse where it is used for a new function. In contrast, recycling is the breaking down of the used item into raw materials which are used to make new items...
It then goes on to economic effects, business reuse, and programs for reusing materials. This is all well and good on a global scale, but is not particularly useful for a personal or household level. For our purpose reuse will be discussed at that lower level. Reusing demolition leftovers, old yard stuff, and household items can save a lot of money, while keeping the garbage man a little less busy.

 Here are some smaller items I reused for my garden and landscape in 2009:


Can you find the reused items in these photos(some are hidden and not visible, but are still there):


Without going into detail, there is a lot of items in those photos that were onced used elsewhere. Items you can not see include the old wood from my swimming pool frame(that is now being used for the pond frame and other structural places), old PVC pipe, and homemade compost that was at one time paper plates, food, sawdust from board cuttings, and many other things(which is now in the soil and planters).

Here is a list of things I commonly "reuse":
  • ALL wood or anything made of wood
  • old tree and shrub branches(for firewood)
  • screws, nuts, bolts, and any hardware that is still in good shape
  • plastic containers(when I have too many, I will recycle them)
  • old garbage pales/cans/baskets and most containers
  • plastic bags(If not contaminated with food or chemicals)
  • styro-foam(For insulation or to lighten garden soil)
  • Anything else that might have a use
Basically, the only thing that end up in my garbage is unusable plastic, such as dirty plastic baggies.

For composting I use anything that was at one time part of a plant or tree. The only animal items I put into my compost are egg shells and hair(from myself or my dogs).

Here is a list of common items I use for compost:
  • ALL food scraps that are not meat or contain grease/fat
  • paper plates
  • yard trimmings(except branches, which I use for firewood)
  • dryer lint
  • newspapers(not too much, I recycle most of them)
  • cardboard and non-plastic packaging
Between my normal purchasing, reuse and recycle practices, I will have about one or two plastic shopping bags of trash, every three weeks. When I take my trash can out for pickup, there is usually only one bag in it. I know people who acquire that much trash in a day or two.

Sunday, March 14, 2010

How To Build a Pond Frame Part 2 - Instructions

These instructions have to be very general as noone will have the same needs when it comes to shape, size, and scale. Therefore I will give no dimensions and will not give exact amounts on materials. First I will show how to build a mounted wall(a wall of the frame that will be mounted into the ground with 4x4 posts) and a basic side wall. Then I will show how to put it together and then give the pond some internal shape.

Materials Needed:
  • 4x4 posts
  • 2x4's
  • 5/8" Plywood
  • Wood Protectant(This isn't needed if you buy pretreated wood)
  • Galvanized Lag Screws w/ Washers
  • Galvanized Wood Screws or Galvanized 8d Nails
  • Cement

STEP 1: Construct a Mount Wall

Before you start, treat your wood with some good wood protector. Thoroughly cover all sides of all the wood. Cut your plywood to size and screw onto posts. Screw in 2x4's at the top and bottom as shown below. Keep at least 18" of post below the plywood.


STEP 2: Construct walls

Side walls are very simple to make. Cut your plywood to size then attach 2x4's to the top and bottom. If you need to make a longer wall you can connect two walls together and attach a 2x4 at the seam. The walls don't have to be very strong as there will be packed dirt on one side and the water on the inside will not provide enough pressure to collapse anything.


STEP 3:

Dig holes for your posts then set your mount wall into the holes. Connect the sides with a couple of screws and make sure the mount wall is plumb and level. Fill the holes with cement then check plumb and level a final time. Let dry for at least 24 hours, 48 hours preferably.


STEP 4:

Secure all walls with lag screws and wood screws(or nails) as shown below.


STEP 5:

Fill the outside of the frame with dirt, rock, and/or concrete blocks. Pack the dirt firmly and leave no air pockets. Add mud to the corners and along the bottom of the INSIDE of the frame. Make sure there are no areas where the liner might get pinched. Form the inside shape of the pond with mud and dirt, then cover with a couple of inches of sand.


You are now ready to put in your pond liner.

Wednesday, March 3, 2010

How To Build a Pond Frame Part 1 - Overview and Examples

For instructions go to part 2 HERE.

A frame is not necessary unless you have the need for it. It will help keep the dirt out of your pond area during DIY pool removal, as well as giving your pond sturdy sides. It will also help if you want a straight drop or perfectly sloped side.

Here are some examples of how a frame can be utilized.

 
Here is a 3-sided frame integrated into the sides of the old swimming pool.
Notice how I used it primarily to keep the dirt from entering the pond area.
 
 
The frame has angled sides to give the pond some slope on the left side.
It is important to add dirt to the inside corners and the bottom edge to keep the liner from being pinched.
You do not want sharp angles or gaps anywhere on your frame.

Once you have filled the areas with dirt, you want to secure padding to the wood,
then cover the entire area with a layer of fine sand.
Everything should be smooth to accommodate the pond liner.

 
This 3-sided frame was used mainly for a sloped side and a sturdy bog area.
I used some carpet instead of padding for the underlayment.

Here is the pond right before I added the liner.
The frame makes a perfect and permanent slope that will never get lumpy or collapse.

 
Here you can see an example of how a pond frame might look when used for a bog or other shallow type pond area.

Here is another angle showing an example of the same frame.
Notice how the frame is not complete, but it uses the pool wall is one of its sides. 

For instructions go HERE

Tuesday, February 9, 2010

This Type of a Natural Pond System is Unique

PROBLEMS AND BENEFITS OF THIS SYSTEM

When you get right down to it, this system is an aquaponic system. The only thing that makes it any different than most backyard aquaponic systems is the scale and the fact that it is using a swimming pool, or what used to be a swimming pool. Everything else is what a normal aquaponic system would be. Of coarse, the scale of this system gives it some unique problems as well as some unique opportunities.

In case you don't know, aquaponics combines aquaculture(fish-farming) and hydroponics(growing plants without soil) into a single system. Each system provides some of the needs of the other and eliminates problems that occur to each system individually. For a visual of a basic aquaponic system check this out.

One of the largest problems I have, because of the scale, is that to enclose the system in a greenhouse or similar enclosure is a huge task. You won't find a greenhouse of that size at your local home shop or hardware store. Ultimately, what that means is that in order to grow vegetables during winter months you will have to be creative. Enclosing the grow beds with individual greenhouses or similar coverings is what I am going to do. With such coverings, the pond will not be covered therefore the water will be subject to the cold temperatures and that will effect the fish and the vegetables.I could put the pond under a large greenhouse, but to me, that would just take away the whole idea of a beautiful pond in my backyard. By covering it up the pond will not be visibly accessible. Not really a good option for me.

Since I didn't have enough fish this winter to grow vegetables, I didn't bother making any covers for the beds. I will have them by next winter. I will construct individual greenhouse type coverings that are pretty simple to make using PVC pipe and construction plastic. I am also thinking about some type of solar heating to access some of the mid day warmth in order to keep the water temperatures above the 50F degrees it normally is during the winter.

One of the best things about this type of system is that you are free to use your imagination to create an aesthetically pleasing landscape. You can't do much with a tank and cut barrels a normal backyard system uses. Even on a very small budget, as I had, the backyard is very nice.


Problems and aesthetics aside, the main purpose of this system is to provide a cost effective alternative to a swimming pool by creating an earth friendly aquaponic system that will pay for itself in the long run. You will be able to provide plenty of organic food for you and your family with just a little effort.

Friday, January 29, 2010

How To Easily Remove A Swimming Pool


As easy as 1-2-3!

SIMPLE DO-IT YOURSELF(DIY) SWIMMING POOL REMOVAL

This method of pool removal is so simple it amazed me. Don't get me wrong, it is the method that is easy, the work itself involves some muscle. Imagine how much dirt it would take to fill a medium sized swimming pool. Now imagine if the soil level were dropped by 2 feet. Now imagine a pond somewhere where the pool used to be. Given these senarios, how much dirt would it take to fill that swimming pool now? The answer is much less... much, much less.

How much extra fill-dirt will be needed from an outside source? The answer is "None!"

No tractors ruining your yard. No contractors to charge you anything. As long as your yard is a little larger than your pool, you are in business. I don't know why people haven't thought of this sooner.

For step-by-step instructions go HERE.

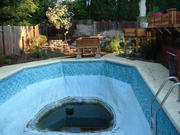
Let's use the yard and pool from my previous post where I calculated its volume to be about 1600 cubic feet.

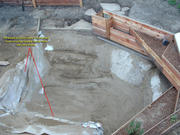
Now let us take the soil line down 2 feet around the pool. We will give it a little shape and give it a little slope on one end back up to the original line.


I left the pool in to show where it was in reference to the new soil line. The top of the pool that is above that new ground line can now have its volume subtracted from the volume of fill dirt needed. Using the exact same method I used in the previous post I can find the volume of the removed portion of the pool using 2 feet as the depth. It comes out to be 610 cubic feet. Subtract that from the total volume to get your adjusted volume, and you are just left with approximately 900 to 1000 cubic feet that will need to be filled in. If you add a pond, you can make that total even lower.

If you want to calculate the area around your pond that will have to be removed in order to fill your hole you will first need to know how much fill dirt will be required. That is why I have been going on about pool volume. Once you have that number you will need to use the following formula:

Width x Height x D = Total Pool Volume
Where "D" represents the amount of the dirt line to be removed. 2 feet seems to work out great for most pools.

You must use the total pool volume, not the adjusted volume. In other words, do not subtract the portion of the pool that would be above the new dirt line. While you don't need to fill that portion of the pool anymore, you also do not have any dirt in that portion already. So they offset each other. Let's use the example that I calculated in the previous post where the total volume was 1600 cubic feet. You will use the total volume(1600) without subtracting the 610 as I just stated above. You never use the adjusted volume(900 to 1000).
  • W x H x 2 = 1600
  • W x H = 1600 / 2
  • W x H = 800
So now you have to plug in some numbers that will work for your yard.
For the above yard I could use the following:
  • 20 x 40 = 800
  • 25 x 32 = 800
  • 16 x 50 = 800
  • etc...
So I will need to remove an area around my pool approximately 20'x40' or 25'x32' or 16'x50' or some other numbers that equal 800. The above example is for a total fill in, if you are adding a pond you need to subtract the pond volume from the 800 and go from there.

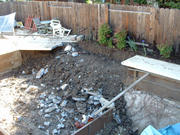
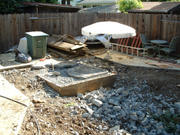
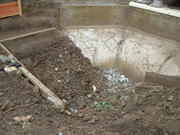
With my actual yard, I had a few obstacles that prevented me from an easy calculation, so I just went ahead with the knowledge I would fill it completely at some point, and that is where I would stop. It didn't take much dirt at all. I had a concrete deck around my pool, so I used the concrete to start the fill in.

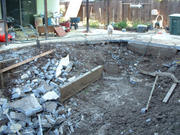
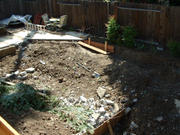
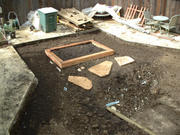
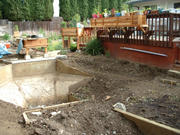
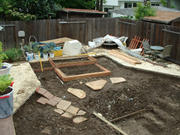
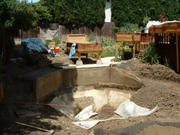
If you can see the whole picture correctly you will notice that the dirt you removed from around the pool went directly in the hole to fill it up. While you do this you build a frame for your pond once you have the bottom filled up to a proper height to allow a pond. In some cases you will need to build the frame before you start filling because you want your pond as deep as possible so you won't want to fill any of the bottom of the pool. Basically the pool bottom will now be your pond bottom. In either case, place your new pond frame and keep filling around it with the dirt you are removing from around the pool. Sooner or later you will reach a point were either you have completely filled the pool and your pond is perfectly in place, or you have reached the limit of dirt that you want to remove from your yard. In the latter case you will just need adjust the pond size accordingly(make it larger). If you are not putting in a pond then once it is filled, you are pretty much done. Just landscape and enjoy your new yard without a pool!

If you put in a pond, then celebrate in knowing that the most difficult, and by difficult I mean "backbreaking", part of the project is over.


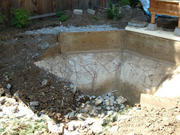
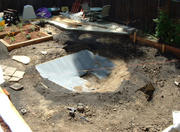
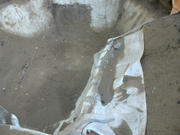
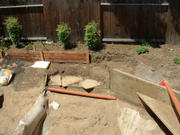
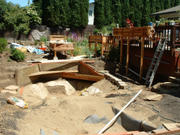
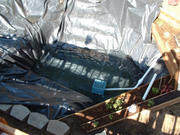
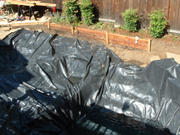
Here is a lot of photos from my project where I filled in my pool using this method. I used the concrete from the pool decking to fill in the pool initially. Since I did not know exactly how much dirt I was going to have under the decking, I put up a temporary retaining wall to keep the dirt and concrete from filling up too much of the hole. Once I saw that I had plenty of dirt I started building the permanent pond frame and just filled up around it. I also used some re-bar drilled 3 feet into the ground to give the ground some stability from the loose concrete blocks.