Setting Up Your Auto-Siphon (Step 4 added Dec 31 for continuous flow drains)
Make sure your bulkheads are complete and leak-free before moving on to this instruction.
Materials Needed:
You shouldn't need any more materials if you have set up your drains according to the last instructions. But in case you just skipped that and set up your own bulkhead you will need the following:
For 3/4" bulkheads:
~4' to 5' of hose/tubing that will fit into your bulkhead(5/8" ID Braided Tubing will fit perfectly into a 1/2" PVC adapter or fitting)
3/4" to 1/2" PVC slip adapter/bushing
~2' of 3/4" PVC pipe
4' - 3" or 4" perforated drain pipe
NOTE - if your bulkhead is other than 3/4" or you are using different size tubing, then you will have to figure out the correct sizes you will need. If using a 1/2" bulkhead you will use everything listed except the 3/4" to 1/2" adapter.
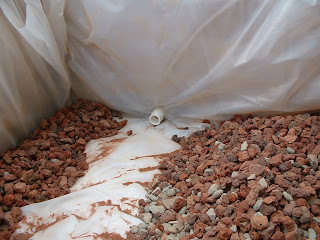
At this point you should have something like this on the inside of your grow bed...


STEP 1
Take your 3/4" PVC pipe and drill holes in it. Lots of them! When finished, connect it to your bulkhead on the inside of the grow bed. Do not glue it on. You might need to take this off and clean it later on down the road. Then take your drain pipe and slide it over the pvc pipe. This will prevent your drain from getting clogged while allowing a free flow of water to the drain. A 4' length will fit from side to side inside your bed.
STEP 2
Connect the tubing to your bulkhead by inserting the adapter into the bulkhead and then the tubing to the inside of the adapter. Do not glue anything at this point. You can glue this together once you have the auto-siphon working. But for now you should leave it unglued. Loop your tubing up and around, ending into your drain pipe(return line to the pond). If you haven't setup your piping yet, now would be a good time.
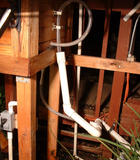
The above image shows a functioning auto-siphon going into a return line.
The second pipe with tubing is coming from another grow bed.
Both of the grow beds were custom made to attach to my preexisting deck.
STEP 3
Turn on your water inlet to your grow bed. If you haven't set that up then just use a hose. Open the flow 100%. Once the water gets close to the top of the tubing turn your water source way down, making the flow about where you are going to want it once the system is running. Watch the water slowly start to trickle down the tubing into the drain. This is where the adjusting comes into play. If the trickle of water remains for more than about two or three minutes, then your flow is too low. Turn it up a bit. If your siphon kicks in, but the water level in your grow bed is still increasing or remains the same, then your flow is too high. Turn the flow down until you can see the water level lowering. You might have to play with this a bit to get the flow adjusted correctly. Once you have it where you want it let it run for a couple of hours and keep an eye on it. If you are using a hose. Turn it off and get to work on your piping.
If you are not implementing a continuous flow to the auto-siphon then you are ready to add your media and finalize the grow bed(next instructions) and you can skip step 4.
STEP 4 (Only for setting up a constant flow drain to your auto-siphon)
The setup for this is almost exactly the same as for the auto-siphon, except that it is in a verticle position instead of horizontal. Plus the output is not in a loop and can be PVC pipe instead of tubing or hose. You will also need to add a ball valve to control the output. It is not necessary, but will aid in stopping the drain if you need to. It also can be advantageous for adjusting flow rate through the drain. So I recommend adding it, even if you don't see the need for it at the moment.
The idea behind adding a constant flow(CF) drain to the auto-siphon is to allow a continuous, filtered water supply to your pond. This is great for waterfalls, but is important for good aeration.
How it works:
The important thing here is to allow slightly more water to enter the grow bed than is flowing out through the CF drain. By doing this the water will still fill the grow bed and let the auto-siphon work its magic for a "Flood and Drain" system. Basically you will be getting the benefits of both types of systems in one.
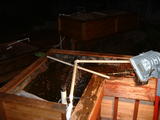
Here are some photos from when I setup my CF drain:


Once you get the drain setup properly, you will need to adjust the flow coming into the grow bed and possibly the output. This took me a couple of days to get the flow exactly right. The biggest propblem I had was the flow rate out of the drain depended on the amount of water in the grow bed. When it is full, the flow rate is at its highest. Once the water level starts getting close to the bottom, the flow rate slows down. When adjusting the water input if you allow too much flow, the auto-siphon, when finishing it's cycle, will trickle water instead of stopping. This "trickling" effect when added to the flow rate leaving the CF drain can equal the amount of water coming in, therefor never filling the bed back up. If you don't allow enough water through the input you may get a water level that remains constant or the auto-siphon might trickle water at the beginning of its cycle and never kick in. This "tricking" effect will will cause the water level to remain at a constant height. This would drown your plants root system. Now take that into consideration and add in the adjustment problems of just an auto-siphon and you can see why it took me a couple of days to get it right. Below is a chart to help you adjust the flow rates for the auto-siphon with a CF drain.
CURRENTLY CREATING A NEW CHART FOR BETTER ACCURACY


No comments:
Post a Comment