
Wednesday, December 29, 2010
Monday, March 29, 2010
Reuse
Wikipedia has an article on reuse. It gives a pretty good definition:
Here are some smaller items I reused for my garden and landscape in 2009:

Can you find the reused items in these photos(some are hidden and not visible, but are still there):


Without going into detail, there is a lot of items in those photos that were onced used elsewhere. Items you can not see include the old wood from my swimming pool frame(that is now being used for the pond frame and other structural places), old PVC pipe, and homemade compost that was at one time paper plates, food, sawdust from board cuttings, and many other things(which is now in the soil and planters).
Here is a list of things I commonly "reuse":
For composting I use anything that was at one time part of a plant or tree. The only animal items I put into my compost are egg shells and hair(from myself or my dogs).
Here is a list of common items I use for compost:
Reuse is to use an item more than once. This includes conventional reuse where the item is used again for the same function, and new-life reuse where it is used for a new function. In contrast, recycling is the breaking down of the used item into raw materials which are used to make new items...It then goes on to economic effects, business reuse, and programs for reusing materials. This is all well and good on a global scale, but is not particularly useful for a personal or household level. For our purpose reuse will be discussed at that lower level. Reusing demolition leftovers, old yard stuff, and household items can save a lot of money, while keeping the garbage man a little less busy.
Here are some smaller items I reused for my garden and landscape in 2009:

Can you find the reused items in these photos(some are hidden and not visible, but are still there):


Without going into detail, there is a lot of items in those photos that were onced used elsewhere. Items you can not see include the old wood from my swimming pool frame(that is now being used for the pond frame and other structural places), old PVC pipe, and homemade compost that was at one time paper plates, food, sawdust from board cuttings, and many other things(which is now in the soil and planters).
Here is a list of things I commonly "reuse":
- ALL wood or anything made of wood
- old tree and shrub branches(for firewood)
- screws, nuts, bolts, and any hardware that is still in good shape
- plastic containers(when I have too many, I will recycle them)
- old garbage pales/cans/baskets and most containers
- plastic bags(If not contaminated with food or chemicals)
- styro-foam(For insulation or to lighten garden soil)
- Anything else that might have a use
For composting I use anything that was at one time part of a plant or tree. The only animal items I put into my compost are egg shells and hair(from myself or my dogs).
Here is a list of common items I use for compost:
- ALL food scraps that are not meat or contain grease/fat
- paper plates
- yard trimmings(except branches, which I use for firewood)
- dryer lint
- newspapers(not too much, I recycle most of them)
- cardboard and non-plastic packaging
Saturday, March 20, 2010
New Pond Location
Have you ever wanted to see where your imagination can take you? This is your opportunity. It is like an artist starting a new painting. Except this is real art, art you can sit in, walk through, and "repaint" anytime you want. Your imagination is the key to your beautiful pond.
When I started looking at ponds for ideas on how I wanted mine to look, I was disappointed, for the most part, as most ponds where very unimaginative and looked like they were factory built. That is not saying that there were not any beautiful ponds or that all of them were unimaginative. I think the problem is that most people hire a contractor to do the work. Contractors are going to stick to the basic ideas they have been using all along. Most of the time, they are not going to build you anything that they have never built before. This is why I urge you to DIY or find a contractor that is an artist as well. The type of pond I found to be, IMO, boring and very unimaginative was the pond surrounded by grey stones, placed in mortar around the pond edge. I don't know how many ponds are of this sort, but it seems(or seemed) to be a very popular choice, for some reason. Come on, if you are going to build something from scratch, why make it as boring as possible? Why not have some fun with this?
LOCATION
Anywhere you want would be my first answer, but since this blog is mainly about converting a swimming pool to a pond, you will likely be limited as to where your pond can be located. It will be wherever your pool is or was. Not many options in this case.
If you are not converting a swimming pool, then as long as you keep it a few feet from the neighbor's property, in your yard, and away from anything structural that will be undermined by digging a hole near it(unless you want to do some expensive restructuring) you can put it anywhere you want.
A few things to keep away from:


A couple of things to try and accommodate:
When I started looking at ponds for ideas on how I wanted mine to look, I was disappointed, for the most part, as most ponds where very unimaginative and looked like they were factory built. That is not saying that there were not any beautiful ponds or that all of them were unimaginative. I think the problem is that most people hire a contractor to do the work. Contractors are going to stick to the basic ideas they have been using all along. Most of the time, they are not going to build you anything that they have never built before. This is why I urge you to DIY or find a contractor that is an artist as well. The type of pond I found to be, IMO, boring and very unimaginative was the pond surrounded by grey stones, placed in mortar around the pond edge. I don't know how many ponds are of this sort, but it seems(or seemed) to be a very popular choice, for some reason. Come on, if you are going to build something from scratch, why make it as boring as possible? Why not have some fun with this?
LOCATION
Anywhere you want would be my first answer, but since this blog is mainly about converting a swimming pool to a pond, you will likely be limited as to where your pond can be located. It will be wherever your pool is or was. Not many options in this case.
If you are not converting a swimming pool, then as long as you keep it a few feet from the neighbor's property, in your yard, and away from anything structural that will be undermined by digging a hole near it(unless you want to do some expensive restructuring) you can put it anywhere you want.
A few things to keep away from:
- Large trees that will drop leaves, needles, flowers, and such into the pond should be avoided, if possible.
- Poisonous or messy plants.
- Steep slopes that will dump rain water or dirt into your pond.
- Locations where your pet defecates. Nothing is worse than stepping in a big pile when you are trying to relax. Plus the smell and insects will take any pleasantry away from the area. If you have to, retrain your animal to go somewhere else. I had to retrain my dog, and it was not easy. I eventually had to build small border rails to show the dog the new boundaries. She eventually got it, and I just took down the rails yesterday.


A couple of things to try and accommodate:
- Keep the pond very visible from inside your house. Try to keep large bushes and trees to the opposite side of your pond and remove anything that will block the view.
- Keep it close and easily accessible.
Sunday, March 14, 2010
How To Build a Pond Frame Part 2 - Instructions
These instructions have to be very general as noone will have the same needs when it comes to shape, size, and scale. Therefore I will give no dimensions and will not give exact amounts on materials. First I will show how to build a mounted wall(a wall of the frame that will be mounted into the ground with 4x4 posts) and a basic side wall. Then I will show how to put it together and then give the pond some internal shape.
Materials Needed:
STEP 1: Construct a Mount Wall
Before you start, treat your wood with some good wood protector. Thoroughly cover all sides of all the wood. Cut your plywood to size and screw onto posts. Screw in 2x4's at the top and bottom as shown below. Keep at least 18" of post below the plywood.

STEP 2: Construct walls
Side walls are very simple to make. Cut your plywood to size then attach 2x4's to the top and bottom. If you need to make a longer wall you can connect two walls together and attach a 2x4 at the seam. The walls don't have to be very strong as there will be packed dirt on one side and the water on the inside will not provide enough pressure to collapse anything.

STEP 3:
Dig holes for your posts then set your mount wall into the holes. Connect the sides with a couple of screws and make sure the mount wall is plumb and level. Fill the holes with cement then check plumb and level a final time. Let dry for at least 24 hours, 48 hours preferably.

STEP 4:
Secure all walls with lag screws and wood screws(or nails) as shown below.

STEP 5:
Fill the outside of the frame with dirt, rock, and/or concrete blocks. Pack the dirt firmly and leave no air pockets. Add mud to the corners and along the bottom of the INSIDE of the frame. Make sure there are no areas where the liner might get pinched. Form the inside shape of the pond with mud and dirt, then cover with a couple of inches of sand.

You are now ready to put in your pond liner.
Materials Needed:
- 4x4 posts
- 2x4's
- 5/8" Plywood
- Wood Protectant(This isn't needed if you buy pretreated wood)
- Galvanized Lag Screws w/ Washers
- Galvanized Wood Screws or Galvanized 8d Nails
- Cement
STEP 1: Construct a Mount Wall
Before you start, treat your wood with some good wood protector. Thoroughly cover all sides of all the wood. Cut your plywood to size and screw onto posts. Screw in 2x4's at the top and bottom as shown below. Keep at least 18" of post below the plywood.

STEP 2: Construct walls
Side walls are very simple to make. Cut your plywood to size then attach 2x4's to the top and bottom. If you need to make a longer wall you can connect two walls together and attach a 2x4 at the seam. The walls don't have to be very strong as there will be packed dirt on one side and the water on the inside will not provide enough pressure to collapse anything.

STEP 3:
Dig holes for your posts then set your mount wall into the holes. Connect the sides with a couple of screws and make sure the mount wall is plumb and level. Fill the holes with cement then check plumb and level a final time. Let dry for at least 24 hours, 48 hours preferably.

STEP 4:
Secure all walls with lag screws and wood screws(or nails) as shown below.

STEP 5:
Fill the outside of the frame with dirt, rock, and/or concrete blocks. Pack the dirt firmly and leave no air pockets. Add mud to the corners and along the bottom of the INSIDE of the frame. Make sure there are no areas where the liner might get pinched. Form the inside shape of the pond with mud and dirt, then cover with a couple of inches of sand.

You are now ready to put in your pond liner.
Wednesday, March 3, 2010
How To Build a Pond Frame Part 1 - Overview and Examples
For instructions go to part 2 HERE.
A frame is not necessary unless you have the need for it. It will help keep the dirt out of your pond area during DIY pool removal, as well as giving your pond sturdy sides. It will also help if you want a straight drop or perfectly sloped side.
Here are some examples of how a frame can be utilized.

Here is a 3-sided frame integrated into the sides of the old swimming pool.
Notice how I used it primarily to keep the dirt from entering the pond area.

The frame has angled sides to give the pond some slope on the left side.
It is important to add dirt to the inside corners and the bottom edge to keep the liner from being pinched.
You do not want sharp angles or gaps anywhere on your frame.

Once you have filled the areas with dirt, you want to secure padding to the wood,
then cover the entire area with a layer of fine sand.
Everything should be smooth to accommodate the pond liner.

This 3-sided frame was used mainly for a sloped side and a sturdy bog area.
I used some carpet instead of padding for the underlayment.

Here is the pond right before I added the liner.
The frame makes a perfect and permanent slope that will never get lumpy or collapse.

Here you can see an example of how a pond frame might look when used for a bog or other shallow type pond area.

Here is another angle showing an example of the same frame.
Notice how the frame is not complete, but it uses the pool wall is one of its sides.
For instructions go HERE
Tuesday, February 23, 2010
Step By Step DIY Pool Removal
Before you begin, use this article to figure out your swimming pool volume, and read this article to get an idea of what is going on and how big of an area around your pool that will need to be dug.
I will be showing how to remove a concrete and a liner pool in these instructions. The only difference between the two is a few of the steps will be different for each, but the overall idea is exactly the same for any type of swimming pool.
The photos posted here are from the removal of a liner pool. Keep in mind that I did my pool a little differently as I had no instructions or experience in doing this. These instructions are put together in such a way as to make it easier for the reader to understand the process. This is not an exact procedure, as every pool and every backyard will have slightly different needs. Although not exact, generally, the overall set of instructions should work for any pool removal.
DIY: HOW TO REMOVE A SWIMMING POOL
1. Drain your pool and remove your filter equipment and/or piping if necessary. You can drain your pool using your current pool pump by attaching a hose to the input of the pump and one at the output. Put the input into your pool and the output wherever you want the water to go. I used the water to irrigate my yard.
In most cases you can remove the old piping as you dig around the pool. So don't worry too much about that yet. You can just remove the pipes that are in the way when digging. Leave the remainder buried unless they will be in the way of future landscaping.

2. For concrete pools, cut out or knock out a couple large holes in the bottom of the pool. This will be for drainage and should be at least 3 feet wide. Fill the holes with rough fill sand, gravel, or drain rock. For liner pools, simply remove your liner.

(Optional) Add some stability to the area by setting rebar in a crossing and in a three dimensional pattern. Push the rebar in about 2 to 3 feet and tie the cross sections together with wire. Just use a simple pattern, or one that will suit the area. For concrete pools you will need to drill holes then put the rebar through the holes.
3. Build your pond frame where you want your pond to be. Refer to this link for instructions on building a pond frame. Remember to keep the top of the pond about two feet below the current ground level(top of your pool). Make sure you support the new frame by setting posts in concrete like you would set fence posts, or by attaching posts to the concrete base of a concrete pool. This will give your pond walls strength when mounted to the posts. If you have a liner pool, you might want to wait until you remove the pool frame so you can reuse the wood for your pond frame.

4. If you have a concrete deck around your pool, break it up and toss it into the the pool. Put the concrete in the deepest areas of the pool. You want the concrete at least 2 feet from the top of your pond.

5. How you do the next step will be determined by your situation. In any of the situations, just throw the concrete or dirt into the pool.
For concrete pools:


7. Pack the area with a soil compactor or something equally effective. Make sure all the gaps are filled and there are no places where a collapse can occur. If there is such an area, you will find out during the first heavy rain storm you get. Unless the area was huge, it won't be a problem to just fill in with more soil or gravel at that time. I had two areas that created small holes in the top soil. One took about a half wheelbarrow to fill, the other just needed a few shovels full of dirt. The larger of the two was created because of the area between the temporary retaining wall(which I did not remove, I just buried it) and the new pond frame didn't get completely filled in.

Your pool is gone. Enjoy your new yard.

I will be showing how to remove a concrete and a liner pool in these instructions. The only difference between the two is a few of the steps will be different for each, but the overall idea is exactly the same for any type of swimming pool.
The photos posted here are from the removal of a liner pool. Keep in mind that I did my pool a little differently as I had no instructions or experience in doing this. These instructions are put together in such a way as to make it easier for the reader to understand the process. This is not an exact procedure, as every pool and every backyard will have slightly different needs. Although not exact, generally, the overall set of instructions should work for any pool removal.
DIY: HOW TO REMOVE A SWIMMING POOL
1. Drain your pool and remove your filter equipment and/or piping if necessary. You can drain your pool using your current pool pump by attaching a hose to the input of the pump and one at the output. Put the input into your pool and the output wherever you want the water to go. I used the water to irrigate my yard.
In most cases you can remove the old piping as you dig around the pool. So don't worry too much about that yet. You can just remove the pipes that are in the way when digging. Leave the remainder buried unless they will be in the way of future landscaping.

2. For concrete pools, cut out or knock out a couple large holes in the bottom of the pool. This will be for drainage and should be at least 3 feet wide. Fill the holes with rough fill sand, gravel, or drain rock. For liner pools, simply remove your liner.

(Optional) Add some stability to the area by setting rebar in a crossing and in a three dimensional pattern. Push the rebar in about 2 to 3 feet and tie the cross sections together with wire. Just use a simple pattern, or one that will suit the area. For concrete pools you will need to drill holes then put the rebar through the holes.
3. Build your pond frame where you want your pond to be. Refer to this link for instructions on building a pond frame. Remember to keep the top of the pond about two feet below the current ground level(top of your pool). Make sure you support the new frame by setting posts in concrete like you would set fence posts, or by attaching posts to the concrete base of a concrete pool. This will give your pond walls strength when mounted to the posts. If you have a liner pool, you might want to wait until you remove the pool frame so you can reuse the wood for your pond frame.

Here you can kind of see the frame under the padding.
I only needed a partial frame, as I used the old pool bottom for the rest.
This photo was taken well into the process.
Unfortunately I have no photos of the actual frame construction.
4. If you have a concrete deck around your pool, break it up and toss it into the the pool. Put the concrete in the deepest areas of the pool. You want the concrete at least 2 feet from the top of your pond.

5. How you do the next step will be determined by your situation. In any of the situations, just throw the concrete or dirt into the pool.
For concrete pools:
- If you can easily break out the top two feet of concrete around your entire pool, then do so.
- If you can not easily break out the top two feet of concrete then dig a two foot deep by two feet wide trench around the pool. Then you should be able to break the top two feet of concrete out.
- If you are not going to be using a current side of your pool as a side for your pond(or you are not going to have a pond) then remove the entire wooden frame around your pool.
- If you want to use part of the current frame as part of the pond frame, then only cut off the top two feet of that particular side. You may need to dig a 2 foot by 2 foot trench behind the frame to make that easier. Remove the rest of the frame without removing any structural support to the part you are leaving in. If that cannot be done you will have to add some new support with a 4x4 post and concrete(just like a fence post).


The string line shows the old soil level.
7. Pack the area with a soil compactor or something equally effective. Make sure all the gaps are filled and there are no places where a collapse can occur. If there is such an area, you will find out during the first heavy rain storm you get. Unless the area was huge, it won't be a problem to just fill in with more soil or gravel at that time. I had two areas that created small holes in the top soil. One took about a half wheelbarrow to fill, the other just needed a few shovels full of dirt. The larger of the two was created because of the area between the temporary retaining wall(which I did not remove, I just buried it) and the new pond frame didn't get completely filled in.

What you see here was a temporary wall(left side) I used to keep the concrete
and dirt from filling the area until I knew I had enough dirt.
After I saw I had enough I began to bury the wall.
I built my frame late into the process.After I saw I had enough I began to bury the wall.

Landscaping my new backyard without a pool.
Wednesday, February 10, 2010
DIY - Do It Yourself
Description of DIY from Wikipedia:
Do it yourself (or DIY) is a term used to describe building, modifying, or repairing of something without the aid of experts or professionals. The phrase "do it yourself" came into common usage in the 1950s in reference to home improvement challenges that people might choose to complete independently.
I have one problem with the the description. It states "without the aid of experts or professionals". I find this to be incorrect. There are many ways to receive "aid" and still consider a project as DIY. While DIY projects get finished by your doing, they frequently require some type of influence or some form of aid. Whether it be from an internet article or from knowledge gained from someone who has already done the same thing, it is still a DIY project. There are just different levels of DIY, which I explain below. I would just define it a little different than they did.
Anyway, if you frequently DIY then you already know the many benefits, here are three:
There are different levels of a DIY project. I'll give a simple example.
Let us say you want a cake with frosting. You have a few options. You can...
So with a project as large as this, you can consider it DIY as long as you don't just hire a contractor to do the entire thing. You could still get someone to help you fill in your pool with dirt, or to help create your pond. You can buy pre-made grow beds or have someone build custom grow beds for you. As long as you are in control of every aspect of the project, you can get aid. Just like you don't have to make the frosting to make your own cake with frosting.
Do it yourself (or DIY) is a term used to describe building, modifying, or repairing of something without the aid of experts or professionals. The phrase "do it yourself" came into common usage in the 1950s in reference to home improvement challenges that people might choose to complete independently.
I have one problem with the the description. It states "without the aid of experts or professionals". I find this to be incorrect. There are many ways to receive "aid" and still consider a project as DIY. While DIY projects get finished by your doing, they frequently require some type of influence or some form of aid. Whether it be from an internet article or from knowledge gained from someone who has already done the same thing, it is still a DIY project. There are just different levels of DIY, which I explain below. I would just define it a little different than they did.
Anyway, if you frequently DIY then you already know the many benefits, here are three:
- COST - This is one of the most, if not the most, attractive benefits. Some DIY projects require little or even no money. They are most certainly less expensive than hiring someone. You can shop around for materials to find better prices. You can reuse materials or use something you already have that is just laying around. But the biggest savings usually come in the form of labor. You will pay nothing for your own labor, except with the time you spend. If you lead a very busy life with little extra time, or you find your extra time more valuable than paying someone to do it for you, then you are most likely not a DIY kind of person. But the next benefit might override that position.
- GAINING KNOWLEDGE - The knowledge that you can gain by DIY is invaluable. Not only will you be better suited to repair or add to a DIY project later on, you will broaden your mental tool set for the rest of your life. To me this is more important than the cost benefit. If you like to know how things work or just like to do things you have never done before, then DIY is a satisfying way to go. Which brings up the next benefit...
- SATISFACTION - The satisfaction you get by DIY is almost always better than having a professional do it. When you DIY, you have ultimate control with everything to get a result that you want. When complete, and if everything was done properly, it should be exactly the way you want it. If you hire a contractor, for instance, how can you truly know the job was done properly, unless you hover over them continuously(which, btw, most contractors do not like)? It might seem to have been done properly, but then sometime down the road, you may find that it was not. Usually this happens after the warranty expires. For instance, my mother had landscaping done by a contractor. Everything was great for about two years, except the trees hadn't really grown much, which didn't seem like a big deal at the time. They still looked healthy, so she didn't really pay them much attention. The third year rolled around and the trees started turning brown and the lawn, which was perfectly flat when put in, was now very "lumpy". There were mounds and valleys throughout the entire lawn. So I started looking into the soil for a problem, and I immediately found some. They did not remove the decorative rock that was originally there, they just spread it and then covered it with dirt. Where a lot of rock was, ended up being where the lawn was mounded. The valleys had no rock underneath. The soil was like brick. The tree roots had not grown out of the original small hole they had dug. I pulled the trees out by hand, roots and all. The moral of the story here is, you will always have peace of mind and satisfaction when you DIY, if you have the ability to do so.
There are different levels of a DIY project. I'll give a simple example.
Let us say you want a cake with frosting. You have a few options. You can...
- Buy one that is ready to serve and 100% complete.
- Buy a plain cake, then add ready made frosting.
- Buy a plain cake, then add frosting that you made from scratch.
- Buy cake mix, and ready made frosting.
- Make the cake from scratch, use ready made frosting.
- Buy cake mix, then make the frosting from scratch.
- Make both the cake and frosting from scratch.
So with a project as large as this, you can consider it DIY as long as you don't just hire a contractor to do the entire thing. You could still get someone to help you fill in your pool with dirt, or to help create your pond. You can buy pre-made grow beds or have someone build custom grow beds for you. As long as you are in control of every aspect of the project, you can get aid. Just like you don't have to make the frosting to make your own cake with frosting.
Tuesday, February 9, 2010
Planning(or lack of)
There was no lack of planning in any respect to this project. I spent many fall and winter months planning and getting things ready for Spring. Now that I am about finished, I can say, "There are very few aspects of this project that haven't changed from the original plan."
There are a few reasons for this. The reasons are 1 - I found better ways to do things and 2 - I like to let things unfold to see what I have, instead of forcing pre-existing plans that might end up being more difficult, less functional, or less attractive than something else. Basically, I will let the landscape speak for itself, and if something is better suited to my current needs, I go with it.
For instance, while I was breaking out the concrete surrounding my pool, my final task was to remove the area of concrete that used to be a hot tub. I had filled the unused hot tub years ago with dirt and covered it in a thick layer of concrete that matched the surrounding concrete. So after breaking out the concrete and exposing about 8 inches of the top of the tub I was left with a daunting task of having to dig the entire tub out and remove it. This would have taken a day, maybe two, to accomplish. Instead, I slapped on a few Redwood fence boards to the top and outside of it. Instant Redwood planter...


So, as you can see, this worked out great. It was much easier than forcing the removal of the tub and going according to my plans.
This example is common throughout the entire process. Everything was changed. I might as well have thrown out my original drawings, because they were irrelevant after the first week. Everything from plumbing to landscape, pond shapes to where the grow beds were to be located was changed to accommodate the "Real World" application of this project. If I were to ever do this again, the planning(at least the construction and landscape part of it) would be an afterthought.
While I wouldn't recommend not planning at all to anyone, it does workout better for the do-it-yourself-er. Get an idea of how you want things and then start working toward that goal. Along the way you will find many things will simply work out better a different way.
That said, you will have to plan a few things such as...
- How big your pond will be. This will effect many things such as how many grow beds will you need, pump and liner size.
- Do you want a waterfall and/or stream. This will effect pump size, the location and structure of your pond
- Which type of grow bed media, landscape plants, type and amount of boulders/rock, pathway materials, concrete or wooden edging, etc...
This Type of a Natural Pond System is Unique
PROBLEMS AND BENEFITS OF THIS SYSTEM
When you get right down to it, this system is an aquaponic system. The only thing that makes it any different than most backyard aquaponic systems is the scale and the fact that it is using a swimming pool, or what used to be a swimming pool. Everything else is what a normal aquaponic system would be. Of coarse, the scale of this system gives it some unique problems as well as some unique opportunities.
In case you don't know, aquaponics combines aquaculture(fish-farming) and hydroponics(growing plants without soil) into a single system. Each system provides some of the needs of the other and eliminates problems that occur to each system individually. For a visual of a basic aquaponic system check this out.
One of the largest problems I have, because of the scale, is that to enclose the system in a greenhouse or similar enclosure is a huge task. You won't find a greenhouse of that size at your local home shop or hardware store. Ultimately, what that means is that in order to grow vegetables during winter months you will have to be creative. Enclosing the grow beds with individual greenhouses or similar coverings is what I am going to do. With such coverings, the pond will not be covered therefore the water will be subject to the cold temperatures and that will effect the fish and the vegetables.I could put the pond under a large greenhouse, but to me, that would just take away the whole idea of a beautiful pond in my backyard. By covering it up the pond will not be visibly accessible. Not really a good option for me.
Since I didn't have enough fish this winter to grow vegetables, I didn't bother making any covers for the beds. I will have them by next winter. I will construct individual greenhouse type coverings that are pretty simple to make using PVC pipe and construction plastic. I am also thinking about some type of solar heating to access some of the mid day warmth in order to keep the water temperatures above the 50F degrees it normally is during the winter.
One of the best things about this type of system is that you are free to use your imagination to create an aesthetically pleasing landscape. You can't do much with a tank and cut barrels a normal backyard system uses. Even on a very small budget, as I had, the backyard is very nice.


Problems and aesthetics aside, the main purpose of this system is to provide a cost effective alternative to a swimming pool by creating an earth friendly aquaponic system that will pay for itself in the long run. You will be able to provide plenty of organic food for you and your family with just a little effort.
Sunday, February 7, 2010
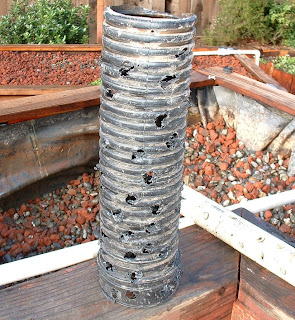
Repairing a Grow Bed Constant Flow Drain
While I was cleaning some debri from one of my grow beds I accidentally knocked into the constant flow drain pipe. When I did, it raised the pipe up just enough to let a few rocks get under it. The rocks prohibited the flow of water enough to cause the system to not function properly. The water would never fully drain which caused the auto-siphon to "trickle" burps of water at the end of the cycle, preventing the water to fully drain, thus never filling back up. The rocks had to be removed.
So I removed all the rock surrounding the immediate area of the drain to repair it. Removed the rocks that were, by that time, all the way down into the drain itself. I added another base to the pipe protection, drilled more holes fro better flow, and put it all back together again.
Here is what it looked like:

This is the CF drain after removing all the rock and pipe

This was the original drain cover which was too small

This is the drain cover and pipe after adding a new base to the cover and drilling more holes


Everything is back together and before I put the rock back over the drain, I make sure everything is functioning properly.
Friday, January 29, 2010
How To Easily Remove A Swimming Pool


As easy as 1-2-3!
SIMPLE DO-IT YOURSELF(DIY) SWIMMING POOL REMOVAL
This method of pool removal is so simple it amazed me. Don't get me wrong, it is the method that is easy, the work itself involves some muscle. Imagine how much dirt it would take to fill a medium sized swimming pool. Now imagine if the soil level were dropped by 2 feet. Now imagine a pond somewhere where the pool used to be. Given these senarios, how much dirt would it take to fill that swimming pool now? The answer is much less... much, much less.
How much extra fill-dirt will be needed from an outside source? The answer is "None!"
No tractors ruining your yard. No contractors to charge you anything. As long as your yard is a little larger than your pool, you are in business. I don't know why people haven't thought of this sooner.
For step-by-step instructions go HERE.
Let's use the yard and pool from my previous post where I calculated its volume to be about 1600 cubic feet.

Now let us take the soil line down 2 feet around the pool. We will give it a little shape and give it a little slope on one end back up to the original line.

I left the pool in to show where it was in reference to the new soil line. The top of the pool that is above that new ground line can now have its volume subtracted from the volume of fill dirt needed. Using the exact same method I used in the previous post I can find the volume of the removed portion of the pool using 2 feet as the depth. It comes out to be 610 cubic feet. Subtract that from the total volume to get your adjusted volume, and you are just left with approximately 900 to 1000 cubic feet that will need to be filled in. If you add a pond, you can make that total even lower.
If you want to calculate the area around your pond that will have to be removed in order to fill your hole you will first need to know how much fill dirt will be required. That is why I have been going on about pool volume. Once you have that number you will need to use the following formula:
Width x Height x D = Total Pool Volume
Where "D" represents the amount of the dirt line to be removed. 2 feet seems to work out great for most pools.
You must use the total pool volume, not the adjusted volume. In other words, do not subtract the portion of the pool that would be above the new dirt line. While you don't need to fill that portion of the pool anymore, you also do not have any dirt in that portion already. So they offset each other. Let's use the example that I calculated in the previous post where the total volume was 1600 cubic feet. You will use the total volume(1600) without subtracting the 610 as I just stated above. You never use the adjusted volume(900 to 1000).
- W x H x 2 = 1600
- W x H = 1600 / 2
- W x H = 800
For the above yard I could use the following:
- 20 x 40 = 800
- 25 x 32 = 800
- 16 x 50 = 800
- etc...
With my actual yard, I had a few obstacles that prevented me from an easy calculation, so I just went ahead with the knowledge I would fill it completely at some point, and that is where I would stop. It didn't take much dirt at all. I had a concrete deck around my pool, so I used the concrete to start the fill in.
If you can see the whole picture correctly you will notice that the dirt you removed from around the pool went directly in the hole to fill it up. While you do this you build a frame for your pond once you have the bottom filled up to a proper height to allow a pond. In some cases you will need to build the frame before you start filling because you want your pond as deep as possible so you won't want to fill any of the bottom of the pool. Basically the pool bottom will now be your pond bottom. In either case, place your new pond frame and keep filling around it with the dirt you are removing from around the pool. Sooner or later you will reach a point were either you have completely filled the pool and your pond is perfectly in place, or you have reached the limit of dirt that you want to remove from your yard. In the latter case you will just need adjust the pond size accordingly(make it larger). If you are not putting in a pond then once it is filled, you are pretty much done. Just landscape and enjoy your new yard without a pool!
If you put in a pond, then celebrate in knowing that the most difficult, and by difficult I mean "backbreaking", part of the project is over.


Here is a lot of photos from my project where I filled in my pool using this method. I used the concrete from the pool decking to fill in the pool initially. Since I did not know exactly how much dirt I was going to have under the decking, I put up a temporary retaining wall to keep the dirt and concrete from filling up too much of the hole. Once I saw that I had plenty of dirt I started building the permanent pond frame and just filled up around it. I also used some re-bar drilled 3 feet into the ground to give the ground some stability from the loose concrete blocks.


Subscribe to:
Posts (Atom)