Showing posts with label Pond Filtration. Show all posts

Sunday, February 7, 2010

Repairing a Grow Bed Constant Flow Drain

While I was cleaning some debri from one of my grow beds I accidentally knocked into the constant flow drain pipe. When I did, it raised the pipe up just enough to let a few rocks get under it. The rocks prohibited the flow of water enough to cause the system to not function properly. The water would never fully drain which caused the auto-siphon to "trickle" burps of water at the end of the cycle, preventing the water to fully drain, thus never filling back up. The rocks had to be removed.

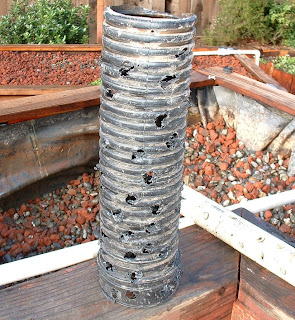
So I removed all the rock surrounding the immediate area of the drain to repair it. Removed the rocks that were, by that time, all the way down into the drain itself. I added another base to the pipe protection, drilled more holes fro better flow, and put it all back together again.

Here is what it looked like:

 
This is the CF drain after removing all the rock and pipe

 
This was the original drain cover which was too small

This is the drain cover and pipe after adding a new base to the cover and drilling more holes

 
Everything is back together and before I put the rock back over the drain, I make sure everything is functioning properly.

Wednesday, December 2, 2009

How To Make a Grow Bed (PART 3 - Setting Support Posts)

Setting Posts for a Grow Bed

There are two ways to set posts for the grow beds. The surface on which you are going set the bed will determine how your posts are set. If you are going to put the bed above a hard surface such as concrete, you will set the posts on footings. If you are setting up the grow bed above dirt or any other unstable type of surface you will need to set up posts with concrete into a hole, just like a fence post

Fencepost Method


Footings


For this setup we will be using the fencepost method. Here is what you should have when done with this part.


MATERIALS NEEDED:

5 - 4"x4" Posts (See note below to determine length of posts.)
2 - 2"x4" Studs (See note below to determine length)
6 to 10 - 80lb bags of concrete* (your actual amount will depend on the size of the holes you dig. I always buy extra, it's cheap and has many uses)
4 - 3" Galvanized Lag Screws
4 - Galvanized Washers
Few - 2 1/2" or 3" screws
Gravel

* TRY NOT TO USE POST HOLE CEMENT. If you have no choice or you already bought some, you can use it, but it will not be strong enough for this purpose unless you premix it.

To determine post lengths: Four of the 4x4's you will need to take the desired height of the bottom of the grow bed(or top of the mount) to the ground, plus 18". The fifth 4x4 post and the 2x4 posts will need to be 7" shorter than that. Depending on your length, you can get two or three posts from one 8 foot 4x4 post, so don't purchase more than you need.

STEP 1
Lay your mount where you want the grow bed to be. Correctly place it in position on the ground. Mark the ground where your posts will be according to the image below. Remove the mount and start digging. Holes should be about 20" to 24" inches deep. See image below.


When digging the holes, make sure the bottom of the hole is larger than the top. See image below. This prevents the post from sinking into the ground in the future. This is important because of the enormous amount of weight that will be fluctuating continuously. Once the holes are dug, set your mount back over them and make sure the center of each hole lines up with the mount correctly.


After verifying the holes are correct keep the mount in place and level it by placing blocks underneath each corner. Then add enough gravel to each hole to make them about 18" deep. Place the four corner 4x4 posts into the holes and use the mount as a guide to lineup the posts correctly. Use a level or a string line to make sure all the posts are at exactly the same height. Add or remove gravel to the holes as needed.


Now you need to plumb the posts, this can be a little tricky. Use a post level if you have one, if not you will need to do it manually by adding guide boards on two sides of a post to make adjusting the post easier. See image below.


Once two posts are plumb, put a board over the top of them and screw it into the top of each post. Make sure the tops are still level. Screw the mount into the posts for temporary stability. Repeat on opposite side for the other two posts.


Double check all of your posts for plumb and level. Once you are happy everything is good, prepare the cement according to the instructions on the bag. If you are using post hole cement, DO NOT pour it into the hole then add water to the hole as the instructions will read. Premix it in a wheelbarrow, then it should be fine to use. Do not add too much water. The more water you add, the weaker the cement will be. When it is ready, pour some into each of the four holes with posts, slightly overflowing the hole. Take a stick or something and work the cement down into the holes, removing any air pockets. Once poured, recheck all of your posts again. Make adjustments quickly for ONLY anything that is too much off the mark, but if something is slightly off, don't worry about it. You want the posts to be set firmly in the concrete and moving them around will weaken the setting. Let dry for 48 hours.

Once dry, you can move the support mount up to the very top and level with the posts. Put the washers on the screws. Secure the mount with the lag screws by pre-drilling holes through the mount and one inch into the posts. Make sure the drill bit is smaller than the screw and do not drill too far into the post. An inch will be far enough. Use a socket wrench to tighten the lag screw.


Add the next three posts(4x4 and two 2x4 posts) underneath the 4x4 beam by placing the posts into the holes and secure them to the 4x4 beam. Plumb them then add the cement to the holes. Let dry 48 hours.


This shows the center post after placing
the grow bed on the mount,
which you will do in the next part.

Here is a 3D Model for a clear view of what you should have now.


That is it, you ready for the next part.

Tuesday, November 24, 2009

How To Make a Grow Bed (PART 2 - Mounting Support)

This instruction is for the mounting support that will go underneath the grow bed and is attached to the posts. Once the mounts are in place you just set the grow bed on top of it and secure it.


The above photo was taken when I was designing the mount and is not exactly what the final support looks like, but it does give you a good idea. An additional three posts(one 4x4 and two 2x4 posts) and a 4x4 support beam are added to the final design.

MOUNTING SUPPORT

MATERIALS NEEDED:
5 - 2" X 4" X 8' Studs
1 - 4" X 4" X 8' Post
10 - 90degree angle brackets(any type, make sure they are strong)
20 - 3" Deck Screws
50 - 1" Wood Screws or Nails

STEP 1
Cut your 2x4's at the following lengths:
2 @ 48"
3 @ 29"
2 @ 77"


STEP 2
Using the 3" screws, screw the boards together as shown in image 1 below. When done with the 2x4's, add the 4x4 beam with the angle brackets and 1" screws. I could try to explain it all, but I think it will be easier just to follow the drawing(image 1). Use the remaining angle brackets for the inside corners where the longer 2x4's are connected.


The green lines show where the posts will be once it is mounted. The grow bed will then set directly on top of the mount. Mounting instructions will be next.

Here is a photo of what it should look like when mounting the grow bed:


Get ready to dig for the next part. Oh what fun.

Friday, November 20, 2009

How To Make a Grow Bed (PART 1 - The Grow Bed)

This will give instructions for making a grow bed box out of wood. This does not include the mounting, underneath support, or the liner and drains. Each of these steps will have there own set of instructions. I feel this is a better way to go. A few small sets of instructions rather than one massive set of instructions is easier to follow IMO.

So here we go, the first of daily(or almost daily) instructions to cover everything this project entailed.


HOW TO MAKE A GROW BED

Materials needed:
15 - 2" x 4" x 8' fir or redwood studs
1 - 4' x 8' x 5/8" plywood

9 - 2" x 4" x 8' redwood studs(you can also use 1x4 redwood)
1lb - 1 5/8" wood screws
1lb - 2 1/2" or 3" wood screws
12 - 90degree angle brackets(any type, make sure they are strong)
4 - 24" strap ties(any type and you can get away with using only 2)
1lb - 1" nails or wood screws

Step 1
Take 2 of your studs and lay them on a flat surface. Spread them 4 feet apart and place the plywood on top of them. With the studs smaller sides contacting the floor and the plywood, line up the studs with the edges of the plywood. Secure them by screwing through the plywood into the studs every 6 inches with 1 5/8" screws.

Now measure the distance between the two mounted studs, it should be 45", but always measure for certainty. Cut 2 boards at that length using 1 of the studs. Now place the newly cut boards in between the mounted studs and secure with 1 5/8" screws by screwing through the plywood into the boards. Next, connect the mounted 2x4's at the corners with 3" screws. Image 1 below shows the details.

Now turn the plywood so it is face down with the mounted 2x4's on top. Take 8 of the angle brackets and mount them as shown in image #1 below.


Step 2
Now you are going to build the side walls up using 2x4's. You will want to take the studs and build 4 boxes. You will do as you did when mounting them to the plywood, but this time you will be adding the studs in between to form the box first. Using the exact same measurement(45") cut 8 lengths of board using 4 studs. Line up 2 of the newly cut boards between the ends of two studs and screw them together using 3" screws as in image 2A below. It is important that all these boxes are the exact same size, 4' x 8'. Don't worry if the corner angles are not exactly perfect at this point.


Once the boxes are complete take one and place it on top of the box mounted to the plywood. Take a 3" screw and, going in at an angle, mount it to the box below it. Repeat this with each box until you have an almost complete grow bed. Image 2B below shows the details.


Now take a strap tie and secure each board to the one below it on the inside of each wall using 1" screws or nails. Repeat for each side.

Step 3
Now we will make it look better and at the same time make it stronger. Take 1 of the redwood studs. Find the center of it and draw cut lines at 45 degree angles as shown in figure 3A below.


Now take 2 redwood studs and cut the ends at 45 degree angles to match up with the smaller boards, forming a rectangle. Screw them together with 3" screws as shown in image 3B below. You will first have to drill guide holes to prevent the wood from splitting. A 1/8" or a 5/32" drill bit will work. Once you have it complete, set it on top of the grow bed and secure with 3" screws as shown in image 3B below.


Now using the remainder of the redwood cut and secure trim as shown in image 3c below. You don't have to use the exact patterns I did, but make sure you have at least one center board that connects all of the wall studs. This will prevent the walls from bowing out when filled and only needs to be done on the two long walls.

On second thought, the trim is better put off for now. You can still do it now, but it will make certain things more difficult if it is in place. A better time to add the trim would be after it is fully functioning and as the final detail. So the option is yours, but I recommend waiting until the end.


In the picture above I used a different, and stronger pattern. I was running out of wood and money at this point, so the trim is not all redwood.

That is it. Next I will show you how to make the mounting supports for the bottom of the bed once it is mounted.